Preserving & Canning: Empowering Food Security in Vanuatu
In Vanuatu, a country rich in culture and natural beauty, food security is a shared concern among local communities. Kieran Richardt, Director of Natura Pacific and owner of Messines Farm is working alongside community leaders and residents to enhance food security through collaborative efforts in education and sustainable practices.
Understanding the importance of local knowledge and traditions, the initiative prioritises community-led solutions. By partnering with local organisations, workshops are facilitated and training sessions that empower residents with the skills to preserve and jar food, reducing waste and ensuring a steady food supply for their families.
This approach respects Vanuatu’s rich culinary heritage while introducing innovative techniques to enhance food safety and longevity. By combining traditional preservation methods with modern practices, communities can adapt to environmental changes without compromising their cultural identity.
Aligned with Natura Pacific’s commitment to environmental conservation, the initiative promotes sustainable food preservation methods that reduce reliance on single-use packaging and minimise carbon emissions associated with food transportation. By preserving local produce, communities contribute to biodiversity conservation and sustainable farming practices, protecting Vanuatu’s natural resources for future generations.
Recognising the strength in unity, Messines Farm and Natura Pacific collaborates with local community and international partners to amplify the impact of the initiative. Through shared resources and collective action, the project reaches more communities, fostering resilience and fostering a culture of mutual support and cooperation.
Our collaborative approach to enhancing food security in Vanuatu demonstrates a commitment to respecting and empowering local communities. By fostering partnerships, promoting sustainable practices, and honouring cultural traditions, Natura Pacific and Messines Farm are contributing to a more resilient and prosperous future for the people of Vanuatu, where food security is a shared responsibility and a collective achievement.
Learn preserving and canning ‘how to’ below:

If you would like to support our capacity-building work in Vanuatu or our regenerative agriculture at Messines Farm in Australia, contact us to see how you can be involved.
- Published in Recipe
Fruit Forever: How to Enjoy Your Harvest All Year Round
Fruit preservation may seem like a dry topic, but it’s really quite juicy! Whether you’re a fruit fanatic or simply looking for ways to extend the life of your favourite fruits, there are various preservation methods to choose from. From pickling to jamming, the possibilities are endless, and the puns? They practically write themselves!
Let’s start with the basics. When it comes to fruit preservation, the two most popular methods are canning and freezing. Canning is a great way to preserve fruit, but it can also be a bit intimidating for beginners. After all, there’s a lot at stake (and in the jars)! However, with the right tools and a little know-how, anyone can can. And yes, I just used “can” three times in one sentence. It’s canned-tastic.
If you’re not ready to jump into canning, freezing is a great alternative. Freezing fruit is a simple and easy way to preserve it. Plus, frozen fruit is perfect for smoothies, pies, and other delicious treats. Just make sure to leave some room in your freezer for your frozen fruit, or you’ll be in a jam. Speaking of jam…
Jamming is another popular preservation method, and for a good reason. Jam is a delicious way to enjoy fruit all year long. It’s also a great way to use up fruit that’s on the verge of going bad. Mix it with some sugar, pectin, and a few puns, and you’re good to go!
If you’re feeling adventurous, pickling is a fun and funky way to preserve fruit. Pickled fruit may sound strange, but it’s quite delicious. It’s the perfect balance of sweet and sour, and it’s great for snacking or adding to salads. Plus, you can make all sorts of puns with pickled fruit. “That’s a dill-icious pickle!” “You’re in a pickle now!” “It’s a pick-le of the litter!”
Of course, not all fruits are created equal when it comes to preservation. Some fruits, like berries, are great for canning and jamming. Others, like peaches and plums, are better suited for freezing. And some fruits, like apples and pears, are perfect for pickling. It’s all about finding the right method for the right fruit. So, don’t be afraid to get fruity with your preservation methods!
When preserving fruit, there are a few things to keep in mind. First and foremost, make sure to follow the recipe. Fruit preservation is a science, and even a small deviation from the recipe can result in a jar of mushy, mouldy fruit. And let’s face it, nobody wants a mouldy jar of fruit.
Another essential thing to keep in mind is storage. Proper storage is key to keeping your preserved fruit fresh and delicious. Make sure to store your jars in a cool, dry place away from direct sunlight. And if you’re freezing your fruit, make sure to use freezer-safe containers. Nobody wants a freezer burn on their fruit! It’s a real frost-tastrophy!
In conclusion, preserving fruit is a fun and delicious way to enjoy your favourite fruits all year. Whether you’re canning, freezing, jamming, or pickling, there’s a preservation method for every fruit. So, get out there and get fruity! And don’t forget to bring your puns along for the ride.
- Published in Recipe
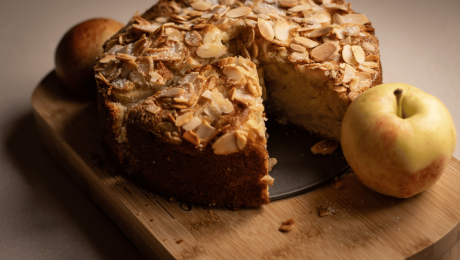
Fall in Love with Baking: A Gluten-Free Apple Cake Recipe
Autumn is the perfect season for baking. The crisp air and the colourful leaves inspire us to spend more time indoors, experimenting with new recipes and enjoying the warmth of the oven. One of the most popular treats this time of year is apple cake. The sweet and tart flavour of apples pairs perfectly with the warm spices and rich flavours of the season. If you’re looking for a gluten-free recipe that’s easy to make and delicious, look no further. Here’s how to make a gluten-free apple cake that will become a family favourite.
Ingredients:
- 2 cups gluten-free flour blend
- 2 tsp baking powder
- 1 tsp baking soda
- 1 tsp ground cinnamon
- 1/2 tsp ground nutmeg
- 1/2 tsp ground ginger
- 1/2 tsp salt
- 3/4 cup unsalted butter, softened
- 1 cup granulated sugar
- 2 large eggs
- 2 tsp vanilla extract
- 1 cup unsweetened applesauce
- 1 large apple, peeled and chopped
Directions:
- Preheat your oven to 350°F (180°C) and grease a 9-inch cake pan.
- In a medium bowl, whisk together the gluten-free flour, baking powder, baking soda, cinnamon, nutmeg, ginger, and salt. Set aside.
- In a large mixing bowl, cream together the butter and sugar until light and fluffy. Add the eggs one at a time, beating well after each addition. Stir in the vanilla extract.
- Add the dry ingredients to the wet ingredients, alternating with the applesauce, beginning and ending with the dry ingredients. Mix until just combined.
- Fold in the chopped apple.
- Pour the batter into the prepared cake pan and smooth the top with a spatula.
- Bake for 35-40 minutes, or until a toothpick inserted in the center comes out clean.
- Remove from the oven and allow the cake to cool in the pan for 10 minutes.
- Run a knife around the edges of the pan to loosen the cake, then invert onto a wire rack to cool completely.
Serve the gluten-free apple cake with a dollop of whipped cream or a scoop of vanilla ice cream for a delicious autumn treat.
Tips:
- If you don’t have a gluten-free flour blend, you can make your own by combining equal parts rice flour, potato starch, and tapioca flour.
- Use a tart apple like Granny Smith for the best flavor and texture.
- You can also add chopped nuts, raisins, or dried cranberries to the batter for extra flavor and texture.
- To make the cake dairy-free, use a dairy-free butter substitute and unsweetened almond milk instead of butter and regular milk.
Baking an autumn cake is a perfect way to celebrate the season, and this gluten-free apple cake is a delicious option for those who want to enjoy a sweet treat without gluten. The warm spices and juicy apples will make your kitchen smell amazing and the taste will be unforgettable. Give this recipe a try and impress your family and friends with your baking skills. Happy autumn baking!
- Published in Recipe
Homemade Fruit Leathers: A Healthy and Delicious Snack
Fruit leathers are a favourite snack among both kids and adults. They’re sweet, chewy, and satisfying, and they’re the perfect way to satisfy your sweet tooth without reaching for processed sweets. Unfortunately, many store-bought fruit rollups are loaded with sugar, artificial flavors, and preservatives. The good news is that you can easily make your own fruit leathers at home, using only natural ingredients. Here’s how to make homemade fruit leathers that are healthy, delicious, and easy to make.
Ingredients:
- 4 cups fresh fruit (such as strawberries, blueberries, apricots or peaches)
- 1-2 tbsp honey or maple syrup (optional)
- 1 tsp lemon juice (optional)
Directions:
- Preheat your oven to 170°F (77°C) or the lowest temperature setting available.
- Wash and chop the fruit into small pieces, discarding any stems, pits, or tough skins.
- Add the fruit to a blender or food processor and puree until smooth.
- If desired, add honey or maple syrup and lemon juice to taste. This will depend on the sweetness of your fruit, so taste the puree and adjust as necessary.
- Line a baking sheet with parchment paper and pour the fruit puree onto the sheet, spreading it into an even layer with a spatula.
- Bake for 4-6 hours, or until the fruit is no longer sticky to the touch but still pliable.
- Remove the baking sheet from the oven and allow the fruit to cool for a few minutes.
- Use a knife or kitchen scissors to cut the fruit into strips or shapes.
- Roll up the fruit strips or shapes in parchment paper, and store them in an airtight container at room temperature for up to a week.
Tips:
- Use fresh, ripe fruit for the best flavour and texture.
- You can use a combination of different fruits for a more complex flavour.
- If you don’t have parchment paper, use a silicone mat instead.
- You can add spices such as cinnamon or ginger to the puree for extra flavour.
- If you don’t have a blender or food processor, you can use a potato masher or a fork to mash the fruit by hand.
Homemade fruit leathers are a delicious and healthy snack that’s easy to make at home. With just a few simple ingredients and a little bit of patience, you can create a snack that’s free of artificial ingredients and full of natural flavor. The best part is that you can customize the recipe to your liking, using your favorite fruits and flavors. Give this recipe a try and enjoy the delicious taste of homemade fruit leathers anytime, anywhere.
- Published in Recipe


